OSRS Zulrah Guide: Advanced Strategies & Optimization | Tons of XP Blog
Optimize your Zulrah kills in OSRS! This advanced guide covers efficient gear setups, specific rotation strategies, prayer flicking, and maximizing GP/hr.
OSRS Zulrah Guide: Advanced Strategies & Optimization
Building on the basics covered in our Beginner Zulrah Guide, this advanced breakdown covers everything you need to secure your first Zulrah kill — and keep the kills coming consistently. We'll walk through optimal gear setups for every budget and stat level, rotation-specific tactics, and the key techniques that separate struggling attempts from smooth, efficient kills.
Building on the basics covered in our previous guide, this advanced breakdown covers everything you need to secure your first Zulrah kill — and keep the kills coming consistently. We'll walk through optimal gear setups for every budget and stat level, rotation-specific tactics, and the key techniques that separate struggling attempts from smooth, efficient kills. We'll also show you how to leverage RuneLite plugins like Tile Markers and the Zulrah Helper to eliminate the need to memorize the rotations of one of the game's most rewarding bosses.
Optimized Gear Setups
Maximizing your Damage Per Second (DPS) is the key to faster, more efficient kills. Regardless of your level or budget, you should prioritize gear that offers the best Magic Damage bonus, Ranged Strength, and high accuracy. To help with this, we've broken down recommended setups for max, mid-level, and low-level players. For the best results, run Magic as your primary combat style and bring Ranged switches in your inventory — this is the approach we'll be focusing on throughout this guide.
Best in Slot Gear for Zulrah
Below is the absolute best-in-slot gear for fighting Zulrah — the setup that will give you the highest kills per hour. It comes at a high cost, but if your budget allows it, this setup delivers the best possible results.
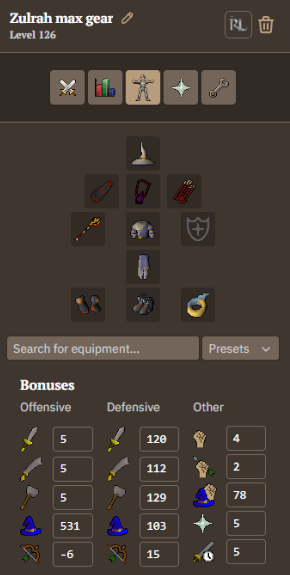
Head slot: Slayer helm (i) or Ancestral hat: use Slayer helm if on slayer task.
Neckslot: Occult necklace
Cape slot: Imbued God Cape
Armour: Ancestral robe top
Leg slot: Ancestral robe bottom
Weapon slot: Tumeken’s shadow
Ammo slot: Dragon arrows (for ranged weapon).
Glove slot: Confliction gauntlets
Ring slot: Magus ring (i) and a Ring of Suffering (ri): Switch to the Ring of Suffering when the Snakelings appear.
Boot slot: Avernic treads (max)
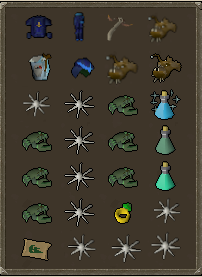
Best in slot inventory Setup
- Ranged switch: Twisted bow, Necklace of anguish, Masori body, Masori legs, Zaryte vambraces, Dizana’s quiver, Masori mask.
- 1 Bastion potion
- 1 prayer potion
- Zul-andra teleport
- Desert amulet 4: unlimited teleports to Nardah, close to Elidinis Statuete which can restore your stats
- Quest point cape or POH teleport if you have a fairy ring in your house
- 4+ Karambwans to combo eat
- Enchanted heart
- Dark crabs
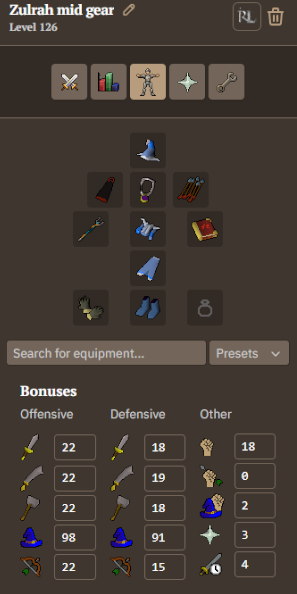
Mid-Level Gear for Zulrah
If you're working with mid-level stats and a limited budget, here's the best affordable gear setup for taking on Zulrah. While it won't match max gear performance, this setup will still get you consistent kills without breaking the bank.
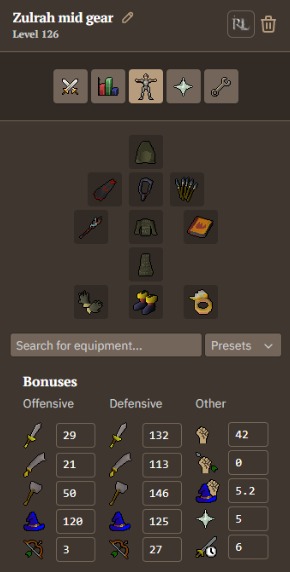
Head slot: Ahrim’s hood
Neckslot: Amulet of Fury
Cape slot: Imbued God Cape
Armour: Ahrim’s robe top
Leg slot: Ahrim’s robe bottom
Weapon slot: Twinflame staff
Shield slot: Tome of fire
Ammo slot: Moonlight antler bolts (ammo for ranged switch)
Glove slot: Barrows gloves
Ring slot: Seer's ring and Ring of Suffering for the snakelings
Boot slot: infinity boots
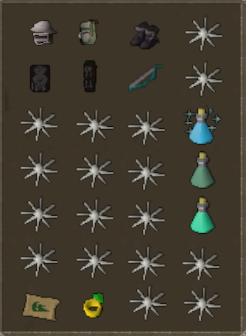
Mid-level Inventory Setup for Zulrah
- Ranged switch: Saradomin d’hide coif, top, bottom, and boots, Hunter Sunlight bow, Ava’s assembler
- 1 Bastion potion
- 1 prayer potion
- Zul-andra teleport
- Ring of dueling (teleport to Ferox enclave): Use rejuvenation pool to restore stats
- Dark crabs and Karambwans to combo eat.
Low-Level Gear for Zulrah
This is the minimum gear we'd recommend for taking on Zulrah consistently, and it's also a solid choice for Ironman accounts.
Head slot: Mystic hat
Neckslot: Amulet of glory
Cape slot: Ava’s accumulator
Armour: Mystic robe top
Leg slot: Mystic robe bottom
Weapon slot: Trident of the Seas
Shield slot: Mage’s book
Ammo slot: rune arrows (ammo for ranged switch)
Glove slot: Barrows gloves
Ring slot: Ring of recoil
Boot slot: Infinity boots
Low-level Inventory Setup for Zulrah
- Ranged switch: Void ranged helm, Ava’s accumulator, Black d’hide top, Black d’hide bottom, Magic shortbow (i), Aranea boots
- 1 Bastion potion
- 1 prayer potion
- Zul-andra teleport
- Ring of dueling (teleport to bank)
- 6+ Karambwans to combo eat
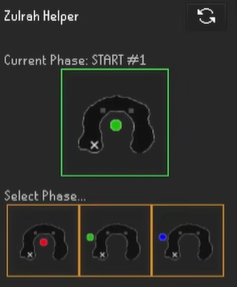
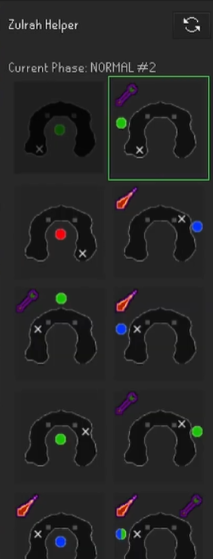
Zulrah Helper plugin
To efficiently kill Zulrah, you need to anticipate each rotation so you can prepare and position yourself accordingly. This is why we highly recommend using the Zulrah Helper plugin — it displays the upcoming phase in real time, allowing you to proactively plan your positioning and style switches before each phase arrives.
To install it, open the Plugin Hub in RuneLite and search for 'Zulrah Helper.' Once installed, the plugin will appear in your RuneLite panel as shown below. Simply enter Zulrah's cave and open it to start tracking her current rotation.
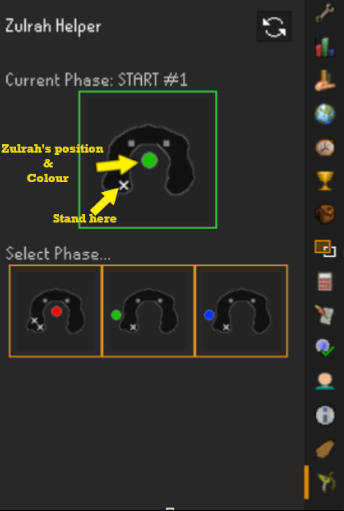
The plugin also displays Zulrah's color and position for each phase. The marked tile (X) shows exactly where you should stand to avoid Zulrah's venom clouds. We'll cover how to make the most of this plugin in more detail below.
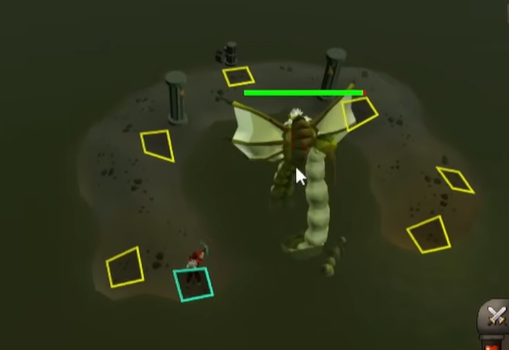
Tile Marker
While in RuneLite, hold Shift and right-click the tiles shown below to mark them. Having these tiles marked makes it significantly easier to stand in the right position throughout the fight, helping you avoid unnecessary damage.
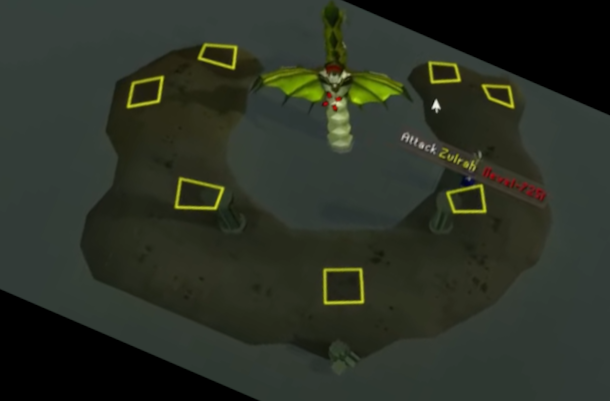
Attacking Zulrah and Preventing her attacks
During the fight, Zulrah will submerge and reappear in a different color, each representing a distinct form. Her current form determines both the attacks she uses and the style she is weakest to — you should always attack with the style she is weak to, as her defence against other combat styles is significantly higher. All three forms, along with her special attacks, are broken down below.
Green Zulrah (serpentine)
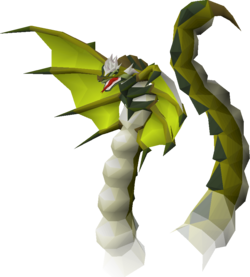
This is the most straightforward form to deal with. Zulrah attacks with Ranged, so activate Protect from Ranged and switch to your best Magic weapon and gear to deal maximum damage.
Red/Orange Zulrah (Magma)
Zulrah attacks with Melee in this form, which can be dodged, so no protection prayer is needed. She remains weak to Magic, so keep your Magic gear equipped. A successful hit in this phase will deal 20-30 damage and leave you stunned for several seconds. She will only attack you with Melee if you are not standing behind one of the pillars in the arena. If venom clouds are blocking the pillar and you're forced into an open position, you'll need to dodge her attack manually. Timing is critical here — watch for her tail wiggle, which signals she is about to strike. The moment you see it, move diagonally to the nearest marked tile that is free of venom.
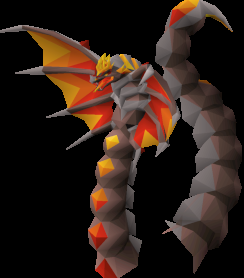
Blue Zulrah (Tanzanite)

Blue Zulrah attacks with Magic, so activate Protect from Magic and switch to your best Ranged weapon and gear, along with your strongest Ranged-boosting prayer. This form is particularly challenging as she also fires Ranged attacks alongside her Magic, meaning you'll have to tank those hits. These can hit up to 40, so make sure to bring combo food such as Karambwans and Sharks to heal up quickly between attacks..
Snakelings

Zulrah will periodically summon Snakelings throughout the fight. This is why a charged Ring of Suffering or Ring of Recoil is essential — equip either when Snakelings spawn and the recoil damage will instantly kill them, since they only have 1 HP. This means you never have to stop attacking Zulrah to deal with them. We strongly recommend the Ring of Suffering over the Ring of Recoil. It holds up to 100,000 charges compared to just 40, meaning you can keep it equipped throughout the entire fight without worrying about it depleting or having to swap it in when Snakelings appear..
Jad Phase
This is the most challenging phase of the fight. Towards the end of the encounter, Zulrah will turn green and begin alternating between Ranged and Magic attacks. To handle this effectively, you need to flick your protection prayers in response to each incoming attack — activate Protect from Magic when you see a Ranged attack incoming, and switch to Protect from Ranged when she fires a Magic attack
Zulrah Rotations
After the first phase which is always the same, Zulrah can appear in any position around the shrine during the fight. After attacking from a position, she submerges and resurfaces elsewhere, typically in a different form. She will occasionally reappear in the same spot, but usually with a different color.
Each rotation maps out Zulrah's location and color at every point in the fight, allowing you to anticipate her next position and form so you can switch your gear and protection prayer in time. She has 4 possible rotations as shown below, and will change forms between 11 and 13 times during each one.
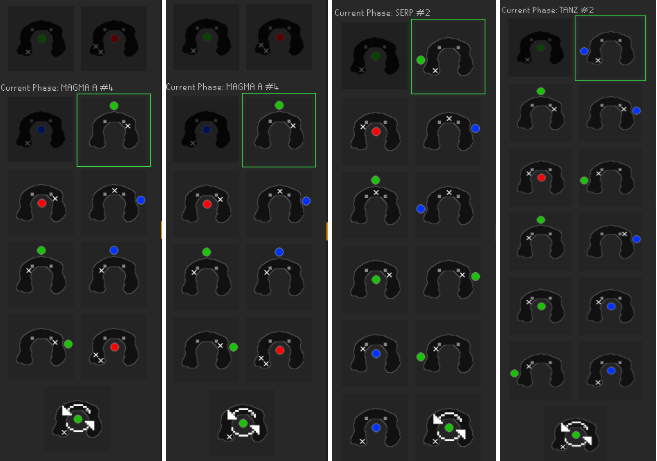
There's no need to memorize the rotations. The Zulrah Helper plugin does the heavy lifting for you — identify the first 4 phases and it will accurately predict her position and form(phase) for the rest of the fight. Check the example below to see exactly how this works
Facing Zulrah: How to use Zulrah plugin
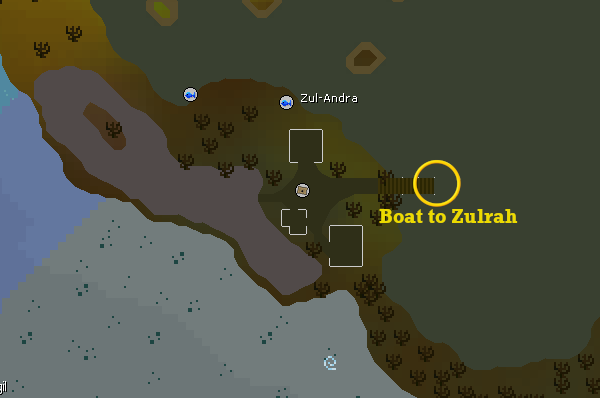
- Before starting, make sure your Magic gear is equipped, your inventory is set up, and the Zulrah Helper is open — you can access it by clicking its icon in the RuneLite panel as shown above. When ready, board the boat to begin the fight.
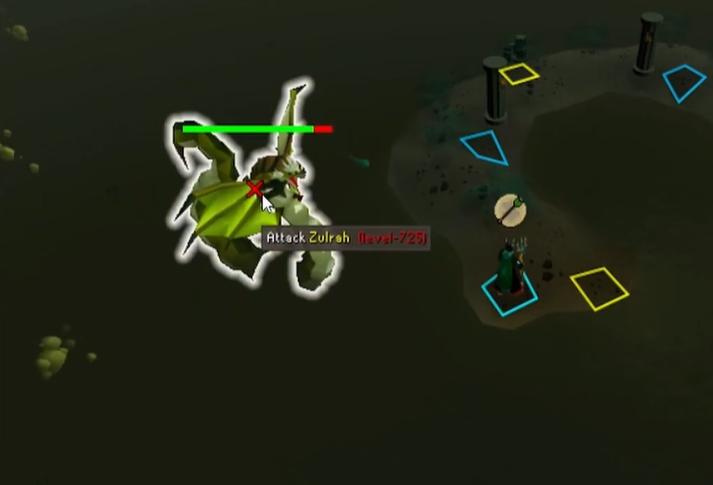
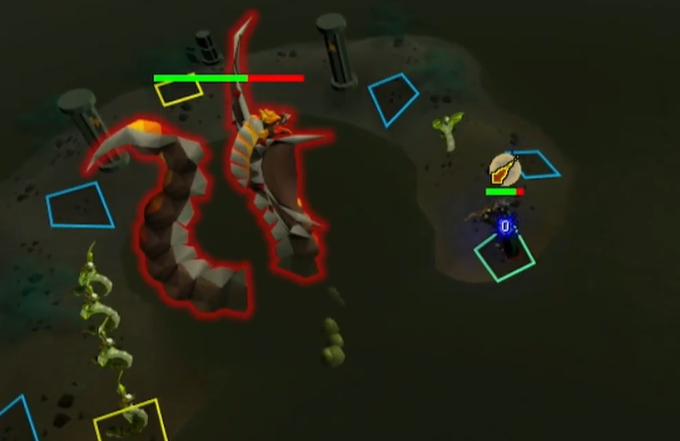
- Once inside, Zulrah won't attack until you perform an action. Use this window to mark the correct tiles if you haven't already, then position yourself in the northeastern corner on the marked tile as shown below. Activate your best Magic-boosting prayer and begin attacking Zulrah with Magic. The Zulrah Helper will confirm you are in Phase 1, which is always the same regardless of rotation.
- Zulrah will always open by spitting 4 venom clouds across the arena. If you are positioned at the northeastern corner as shown above, you won't take any damage. If you do get hit, you will be venomed — drink an Anti-venom and move away from the cloud immediately.
- After the first phase, Zulrah will submerge and move to one of 3 possible positions as shown in the Zulrah Helper. In this example, Zulrah moves to the eastern position and turns green — click the corresponding phase in the plugin so it can begin predicting her future forms and locations. Attack with Magic and activate Protect from Ranged.
- As shown above, once the second phase is selected, the Zulrah Helper will predict all of her remaining movements and display where you should stand to avoid venom. In the next phase, Zulrah appears in the middle in her Magma form, and the plugin directs you to stand at the northwestern corner, as shown belo,w to stay clear of venom. Since you are not behind a pillar, you'll need to dodge her Melee attacks by moving between the marked northwestern tiles. No protection prayer is needed — simply keep attacking with Magic.
- If Snakelings spawn during this phase, equip your Ring of Recoil or Ring of Suffering — their attacks will be reversed, killing them instantly without interrupting your focus on Zulrah.
- Follow the plugin directions for the remainder of the fight, adjusting your position, gear, and protection prayer accordingly. Since you can now predict the next phase, use the moment Zulrah submerges to quickly switch your prayer and gear before she reemerges.
- Jad Phase: This is the trickiest part of the fight, but becomes second nature with practice. Zulrah enters this form before the final phase of every rotation. Her attacks come much faster here, so you'll need to flick your protection prayers quickly and precisely. The rule is simple — when you see a Ranged attack (missile) incoming, activate Protect from Magic, and when you see a Magic attack (fireball), activate Protect from Ranged. Keep your prayer panel open and stay focused; once you get the rhythm down through practice, this phase becomes alot easier.
- After the final phase, Zulrah will return to the centre and begin spitting venom clouds around the arena, signaling the start of a new rotation. Hit the reset button on the plugin and reselect the first phases so it can accurately predict the next rotation.
Advanced Techniques
- Prayer Flicking: Protection prayers like Protect from Magic and Protect from Ranged are essential, but flicking offensive prayers like Rigour and Augury on and off between Zulrah's attacks can save a significant amount of Prayer points, allowing you to extend your trips. This does require precise timing, but it is worth learning once you're comfortable with the fight.
- Vengeance: Casting Vengeance from the Lunar Spellbook just before taking anticipated damage — such as at the start of the Tanzanite phase or during the Jad phase — reflects a portion of that damage onto Zulrah. You'll need to either switch spellbooks or bring Vengeance sacks to use this effectively.
- Efficient Healing: Combo-eating by pairing a Karambwan with a Shark or Anglerfish lets you heal a large amount in a single tick, keeping your HP topped up with minimal DPS loss. Using your POH Ornate Pool or the Ferox Enclave rejuvenation pool for full restores between kills is also a great way to cut down on supply costs.
- Snakeling: The Ring of Suffering passively handles Snakelings for most players, but experienced players sometimes swap it out for a pure DPS ring like the Magus or Archer's ring. If Snakelings become overwhelming, use a Blowpipe or Barrage spell to clear them quickly during safer phases such as the Magma form.
- Tick Eating: This is an advanced technique where you eat food at the exact tick damage is calculated, allowing you to survive hits that would otherwise be lethal. It's difficult to execute consistently at Zulrah due to venom and Snakeling damage, but it can save you from an unexpected death in emergencies.
Maximizing Profit
- Speed: The faster you kill Zulrah, the more kills you get per hour and the more loot rolls you accumulate. Prioritizing DPS through gear and technique is the single biggest factor in your GP per hour.
- Supply Costs: Cut down on Prayer potion usage by flicking prayers and using the POH Ornate Pool or Ferox Enclave for restores between kills. Once you're comfortable with the fight, you can also swap to cheaper food to further reduce costs.
- Banking Speed: Use Zul-andra teleports alongside your POH pool and jewellery box to minimize the time spent between kills. Setting up an efficient bank preset also helps keep your turnaround time as short as possible.
- Blowpipe Scales: If you're using a Toxic Blowpipe, keep in mind that it consumes Zulrah's Scales with every attack. Make sure to factor this cost into your profit calculations so you have an accurate picture of your GP per hour.
GP Per Hour
- With max gear, you can expect around 35 kills per hour, averaging approximately 3.5M GP per hour.
- With mid-level gear, you can expect around 20 kills per hour, averaging approximately 2M GP per hour.
- With low-level gear, you can expect around 14 kills per hour, averaging approximately 1.3M GP per hour.
Conclusion
With the right gear, a solid understanding of her rotations, and the Zulrah Helper doing the heavy lifting, Zulrah quickly goes from one of the most intimidating bosses in the game to one of the most rewarding. Focus on improving your DPS, tightening up your prayer switches, and minimizing downtime between kills — and the GP will follow.
We'll also show you how to leverage RuneLite plugins like Tile Markers and the Zulrah Helper to eliminate the need to memorize the rotations of one of the game's most rewarding bosses. If you need some help, check out OSRS PVM Services!